
在當今的網路開發中,REST API 已成為許多應用程式和系統之間交互的主要方式。Actix Web,作為一個高效能的 Rust 網頁框架,提供了建立這些 API 的強大工具。
本文章將會帶你走過使用 Actix Web 建立 REST API 的整個過程,從專案的初始化到實作 Todo List 的 CRUD API。
建立新專案
開始新增一個專案吧!專案名稱這裡就用 actix_todo,在終端機執行:
cargo new actix_todo
建立完專案後,接下來這個專案還需要安裝以下幾個套件:
actix-web: Actix Web 是一個高效能、非常靈活的 Rust 網頁框架。可以建立網頁伺服器、客戶端。
serde: Serde 是一個 Rust 的序列化框架,允許將複雜的數據結構轉換成為像是 JSON 這樣的簡單格式,並且還能從這些格式中反序列化回 Rust 的數據結構。在許多 REST API 的實作中,Serde 是不可或缺的工具,因為它使得數據的交換變得非常簡單。
chrono: Chrono 是一個處理日期和時間的 Rust 函式庫。它提供了日期、時間、日期時間、時區等功能,非常適合在需要時間戳記或日期操作的情境中使用。
uuid: UUID 函式庫允許生成和解析唯一的通用識別碼 (UUID)。在許多系統中,UUIDs 常被用作唯一識別資源或物件,特別是當傳統的自動遞增 ID 不適用或不夠安全時。
安裝方式只要在終端機分別執行以下指令:
cargo add actix-web
cargo add serde --features derive
cargo add chrono --features serde
cargo add uuid --features v4
建立第一支
1. 引入所需的模組和函式庫
use actix_web::{get, web, App, HttpResponse, HttpServer, Responder, Result};
use serde::{Serialize};
第一步要先引入 Actix Web 框架中所需的各種元件,以及 Serde 的序列化功能。
2. 定義回應結構
#[derive(Serialize)]
pub struct Response {
    pub message: String,
}
這裡我們定義了一個名為 Response 的結構,它包含一個公開的 message,型別為 String。#[derive(Serialize)] 是一個標記,它讓 Response 結構可以被自動序列化為 JSON 格式。
3. 定義健康檢查路由
#[get("/health")]
async fn healthcheck() -> impl Responder {
    let response = Response {
        message: "Everything is working fine".to_string(),
    };
    HttpResponse::Ok().json(response)
}
這段程式碼定義了一個非同步的 healthcheck 函式,這個函式會回應一個表示 API 運作正常的訊息。#[get("/health")] 是一個路由標記,當使用者訪問 /health 路徑時,這個函式會被呼叫。函式中,我們建立了一個 Response 物件並返回了一個 HTTP 200 OK 的回應,包含該訊息。
4. 定義未找到的路由
async fn not_found() -> Result<HttpResponse> {
    let response = Response {
        message: "Resource not found".to_string(),
    };
    Ok(HttpResponse::NotFound().json(response))
}
當其他路由不符合的時候,這個函式將被呼叫。它回應一個 HTTP 404 Not Found 的回應,包含一個表示資源未找到的訊息。
5. 主函式
#[actix_web::main]
async fn main() -> std::io::Result<()> {
    HttpServer::new(|| App::new().service(healthcheck).default_service(web::route().to(not_found)))
        .bind(("127.0.0.1", 8080))?
        .run()
        .await
}
最後在整個程式的入口點 - main。#[actix_web::main] 是一個特殊的標記,使得非同步函式可以作為主函式使用。在 main 中,我們建立了一個 HTTP 伺服器,指定了 /health 路由到 healthcheck(),並設定了預設路由到 not_found()。
最後,伺服器被綁定到本地的 127.0.0.1,端口 8080,並啟動它。
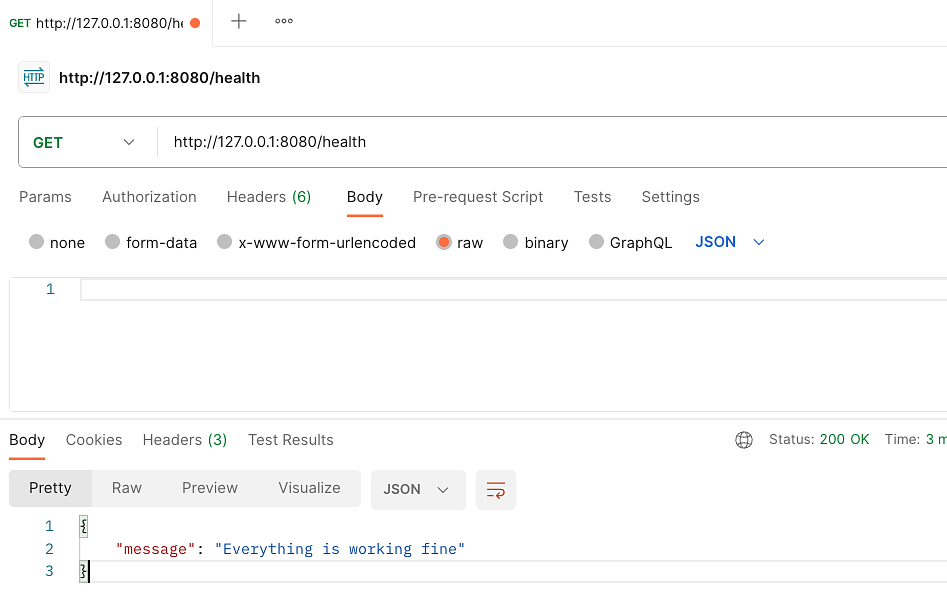
在終端機執行:
cargo run

模組化開發
隨著我們進一步深入 Actix Web 和 Rust,我們將會遇到越來越多的程式碼。在這種情況下,簡單地將所有功能和結構都放在一個檔案中可能會讓事情變得混亂。
在 Rust 中,模組系統允許我們將代碼分割成小的、可管理的單位,每個單位都具有明確的職責。這不僅使我們的應用程式結構更加清晰,還可以更容易地重複使用和測試特定的功能模組。
在接下來的部分,我們會示範如何使用 Rust 的模組系統來組織 Actix Web 專案,並且會繼續新增其他 API。
在開始模組化開發之前,我們要先新增幾個資料夾跟檔案。
mkdir src/api src/models src/repository
touch src/api/mod.rs src/models/mod.rs src/repository/mod.rs
在 main.rs 引入 mod:
use actix_web::{get, web, App, HttpResponse, HttpServer, Responder, Result};
use serde::Serialize;

mod api;
mod models;
mod repository;

#[derive(Serialize)]
pub struct Response {
    pub message: String,
}
開始 Todo List 的 API Endpoint
A. 建立 Todo 的資料 Model
我們在 src/models 目錄下建立一個新的 todo.rs,要建立 Todo 的資料 Model,代表一個待辦事項。會用到 chrono 和 serde,分別處理時間還有 JSON 格式。
// src/models/todo.rs
use chrono::prelude::{DateTime, Utc};
use serde::{Deserialize, Serialize};

#[derive(Serialize, Deserialize, Debug, Clone)]
pub struct Todo {
    pub id: Option<String>,
    pub title: String,
    pub description: Option<String>,
    pub created_at: Option<DateTime<Utc>>,
    pub updated_at: Option<DateTime<Utc>>,
}
接著在 src/models/mod.rs 做一個模組聲明:
pub mod todo;
B. 定義一個內存資料庫來存儲 Todo 物件
由於本文章的範例沒有使用像是 PostgreSQL 之類的資料庫來做存取,比較著重在 REST API 的示範,所以我們會自己定義一個簡單的內存資料庫來示範。
在 src/repository 目錄下建立一個新的 database.rs
1. 引入所需的模組和函式庫
use std::fmt::Error;
use chrono::prelude::*;
use std::sync::{Arc, Mutex};
use crate::models::todo::Todo;
這些 use 聲明引入了:
- 錯誤格式化功能。
- 日期和時間相關的功能。
- Arc 和 Mutex,這是 Rust 中的同步原語,用於多線程共享和修改資料。
- 從 models 模組引入的 Todo 結構。
2. 定義資料庫結構
pub struct Database {
    pub todos: Arc<Mutex<Vec<Todo>>>,
}
Database 結構具有一個公開的字段 todos,它是一個受 Mutex 保護的 Todo 物件的向量,這表示可以在多線程環境中安全地修改它。
3. 為資料庫結構實現功能
impl Database {
    pub fn new() -> Self {
        let todos = Arc::new(Mutex::new(vec![]));
        Database { todos }
    }

    pub fn create_todo(&self, todo: Todo) -> Result<Todo, Error> {
        let mut todos = self.todos.lock().unwrap();
        let id = uuid::Uuid::new_v4().to_string();
        let created_at = Utc::now();
        let updated_at = Utc::now();
        let todo = Todo {
            id: Some(id),
            created_at: Some(created_at),
            updated_at: Some(updated_at),
            ..todo
        };
        todos.push(todo.clone());
        Ok(todo)
    }
}
這個 impl 區塊為 Database 結構增加了功能和方法。
new方法創建一個新的Database實例,其中todos是一個空向量。create_todo方法將一個新的Todo物件加入到todos向量中。該方法生成一個新的 UUID 作為 ID,設置當前的 UTC 日期和時間作為新增和更新時間,然後將Todo物件加入到向量中。
4. 在 src/repository/mod.rs 中的模組聲明
pub mod database;
C. 定義與 Todo 相關的 API 端點
在 src/api 目錄下建立一個新的 api.rs
1. 引入所需的模組和函式庫
use actix_web::web;
use actix_web::{web::{Data, Json}, post, HttpResponse};
use crate::{models::todo::Todo, repository::database::Database};
這些 use 主要引入了:
- Actix Web 的核心組件,用於建立 Web 應用。
- 用於資料提取和反序列化 JSON 數據的功能。
- 從專案中引入的
Todo結構和Database模組。
2. 定義 API Endpoint
#[post("/todos")]
pub async fn create_todo(db: Data<Database>, new_todo: Json<Todo>) -> HttpResponse {
    let todo = db.create_todo(new_todo.into_inner());
    match todo {
        Ok(todo) => HttpResponse::Ok().json(todo),
        Err(err) => HttpResponse::InternalServerError().body(err.to_string()),
    }
}
這是一個異步的函式,用於新增一個新的待辦事項。它期望從 HTTP POST 請求的正文中接收一個 JSON 格式的 Todo 物件。主要接受兩個參數:
- Database 的參考。
- 客戶端提供的新的 Todo 物件。
會建立新的待辦事項並返回適當的 HTTP 響應。
3. 配置 API
pub fn config(cfg: &mut web::ServiceConfig) {
    cfg.service(
        web::scope("/api")
            .service(create_todo)
    );
}
這個 config() 接受一個 ServiceConfig 的參考,並將 API Endpoint 加入它。在此例中,它將 create_todo() 設置為在 /api/todos 路徑上響應。
4. 在 src/api/mod.rs 中的模組聲明
pub mod api;
這行程式碼將 src/api/api.rs 文件作為一個公開的子模組 api 引入到 src/api 模組中。這樣,其他 Rust 代碼可以訪問和使用在 api 子模組中定義的所有公開功能。
最後則是在 main.rs :
#[actix_web::main]
async fn main() -> std::io::Result<()> {
    let todo_db = repository::database::Database::new();
    let app_data = web::Data::new(todo_db);

    HttpServer::new(move ||
        App::new()
            .app_data(app_data.clone())
            .configure(api::api::config)
            .service(healthcheck)
            .default_service(web::route().to(not_found))
            .wrap(actix_web::middleware::Logger::default())
    )
        .bind(("127.0.0.1", 8080))?
        .run()
        .await
}
然後執行 cargo run,就可以進行測試了。
繼續新增其他的 Endpoint。
GET /todos
在 src/api/api.rs 新增函式:
use actix_web::{web::{
    Data,
    Json,
}, post, get, HttpResponse};

// 省略

#[get("/todos")]
pub async fn get_todos(db: web::Data<Database>) -> HttpResponse {
    let todos = db.get_todos();
    HttpResponse::Ok().json(todos)
}

pub fn config(cfg: &mut web::ServiceConfig) {
    cfg.service(
        web::scope("/api")
            .service(create_todo)
            .service(get_todos)
    );
}
然後要實現 get_todos,在 src/repository/database.rs:
impl Database {
    // 省略

    pub fn get_todos(&self) -> Vec<Todo> {
        let todos = self.todos.lock().unwrap();
        todos.clone()
    }
}
GET /todos/{id
也是先在 src/api/api.rs 新增:
#[get("/todos/{id}")]
pub async fn get_todo_by_id(db: web::Data<Database>, id: web::Path<String>) -> HttpResponse {
    let todo = db.get_todo_by_id(&id);
    match todo {
        Some(todo) => HttpResponse::Ok().json(todo),
        None => HttpResponse::NotFound().body("Todo not found"),
    }
}

pub fn config(cfg: &mut web::ServiceConfig) {
    cfg.service(
        web::scope("/api")
            .service(create_todo)
            .service(get_todos)
            .service(get_todo_by_id)
    );
}
然後在 src/repositorydatabase.rs 實現 get_todo_by_id
impl Database {
    // 省略

    pub fn get_todo_by_id(&self, id: &str) -> Option<Todo> {
        let todos = self.todos.lock().unwrap();
        todos
            .iter()
            .find(|todo| todo.id == Some(id.to_string()))
            .cloned()
    }
}
PUT /todos/{id}
在 src/api/api.rs 新增:
use actix_web::{
    get, post, put,
    web::{Data, Json},
    HttpResponse,
};

// 省略

#[put("/todos/{id}")]
pub async fn update_todo_by_id(
    db: web::Data<Database>,
    id: web::Path<String>,
    updated_todo: web::Json<Todo>,
) -> HttpResponse {
    let todo = db.update_todo_by_id(&id, updated_todo.into_inner());
    match todo {
        Some(todo) => HttpResponse::Ok().json(todo),
        None => HttpResponse::NotFound().body("Todo not found"),
    }
}

pub fn config(cfg: &mut web::ServiceConfig) {
    cfg.service(
        web::scope("/api")
            .service(create_todo)
            .service(get_todos)
            .service(get_todo_by_id)
            .service(update_todo_by_id),
    );
}
在 src/repository/database.rs 實現 update_todo_by_id
impl Database {
    // 省略

    pub fn update_todo_by_id(&self, id: &str, todo: Todo) -> Option<Todo> {
        let mut todos = self.todos.lock().unwrap();
        let updated_at = Utc::now();
        let todo = Todo {
            id: Some(id.to_string()),
            updated_at: Some(updated_at),
            ..todo
        };
        let index = todos
            .iter()
            .position(|todo| todo.id == Some(id.to_string()))?;
        todos[index] = todo.clone();
        Some(todo)
    }
}
DELETE /todos/{id}
use actix_web::{
    delete, get, post, put,
    web::{Data, Json},
    HttpResponse,
};

// 省略

#[delete("/todos/{id}")]
pub async fn delete_todo_by_id(db: web::Data<Database>, id: web::Path<String>) -> HttpResponse {
    let todo = db.delete_todo_by_id(&id);
    match todo {
        Some(todo) => HttpResponse::Ok().json(todo),
        None => HttpResponse::NotFound().body("Todo not found"),
    }
}

pub fn config(cfg: &mut web::ServiceConfig) {
    cfg.service(
        web::scope("/api")
            .service(create_todo)
            .service(get_todos)
            .service(get_todo_by_id)
            .service(update_todo_by_id)
            .service(delete_todo_by_id),
    );
}
在 src/repository/database.rs 實現 delete_todo_by_id
impl Database {
    // 省略

    pub fn delete_todo_by_id(&self, id: &str) -> Option<Todo> {
        let mut todos = self.todos.lock().unwrap();
        let index = todos
            .iter()
            .position(|todo| todo.id == Some(id.to_string()))?;
        Some(todos.remove(index))
    }
}
在這篇文章中,我們示範了如何使用 Actix Web 建立 REST API 。Actix Web 不僅為 Rust 開發者提供了強大的工具,還確保了我們的 API 具有卓越的性能和靈活性。隨著 Rust 在網頁開發領域的逐步崛起,相信 Actix Web 會成為更多開發者的首選。